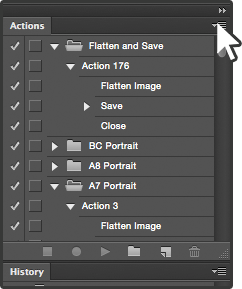
In Photoshop's menu bar at the top, go to the "Window" dropdown and make sure "Actions" is selected.
Photoshop: Automated Bleeds and Cropmarks
As a print company, we have a lot of artwork hit our desk and often these designs are not print ready. We understand that not all of our customers are professional designers and aren't necessarily able to amend their designs themselves.
In a bid to be as helpful as possible, we've put together the below article. We have some downloadable actions/automations that can be easily installed into your version of Photoshop. When installed, these actions will help you get your artwork up to the industry standard of "print ready".
Below you will find downloadable Photoshop action files. Each file relates to a specific page size and orientation. We will talk you through how these can be installed. Furthermore, we'll give you full instructions on how to create Photoshop actions yourself.
Please note that the files below require a full trial or licensed version of Adobe Photoshop to work.
What do we mean by print ready?
Print companies such as us require certain criteria before going to print. This is to make sure everything looks great when it comes off the press. Here are the most important:
-
3mm Bleed:
A bleed is an extension of your artwork beyond the lines where the actual paper will be cut. In other terms, printers will overprint your artwork by 3mm on all sides. Why do we do this? Well, let's say for example you were printing an A5 flyer and we printed your design to exactly A5. If we undercut, which can often happen, your flyer would be left with a nasty white line running down the side where the background has not been printed. If a 3mm bleed is factored in then any under trimming will be covered up by a natural continuation of your design.
-
300dpi Resolution:
To ensure that everything is crisp and proper, the print industry uses a minimum resolution of 300dpi. Please be aware that the Photoshop Actions below will not automatically improve the resolution of your design, e.g. if it is a blurry poster design when you start the action, it will not make it more clearer. However, it will give you a good estimation of how the final printed product will appear. If you're happy with how it looks on screen, then chances are you will be happy with the final printed product.
-
Crop marks:
Very simply, crop marks tell the print house's trimmers where to cut. The issue with crop marks is that they are pretty difficult to add in a lot of design programs. The Photoshop actions below will add a bleed to your print design automatically.
-
CMYK Colour Mode:
Colour modes can be tricky. Computer, TV, phone screens etc. work in RGB colour mode. The long and short of RGB colour modes are that they require a backlight to work. Printers use a different colour mode called CMYK. CMYK colour mode produces different colour strengths and tones by covering the paper colour behind the ink more or less. The reason this is important is because a design in RGB colour mode might look different to the same design in CMYK colour mode, i.e. on screen vs. printed out. Fortunately, Photoshop has a handy feature where you can preview design in CMYK colour mode. So again, the actions below will give you a good estimation of how the final printed product will look.
-
Flattened:
Modern design programs work in 'layers'. This means that every component is stacked up on top of and next to each other to give you your final design. This makes it easier manipulate the design into its final form. The issue with layers is that they can be tricky to print with. Design elements can drop out or move when being transferred to the printer so 'flattening' your design first is really important. This reduces all the layers to one flat layer and makes everything ready to hit the press.
How do the actions make your artwork print ready?
The Photoshop actions below will automatically make your artwork print ready.
They will make sure that you have a 3mm bleed, crop marks, 300dpi resolution, is flattened and that your design is in CMYK colour mode. It does not matter what size your artwork is in before or what file format you have opened in Photoshop (we recommend saving files as high quality PDFs though).
The only important thing is that the design has the same (or similar) proportions to the size you are trying to print at. This is very important. The final design will look distorted and stretched otherwise. Similarly, your artwork needs to have been designed in a similar size to the final product. For example, if you have designed your artwork at A4 size and you use the A2 action, the final result will be very blurry because the design will have been blown up so much. But again, once the action has finished, have a good look over your design to make sure you're happy with how it looks. If you're happy with how it looks on screen then you will most likely be happy with the final printed product. We recommend that you go to "View" in the top tool bar, followed by "Actual Pixels" to get the best estimation of how the final article will look.
How do they work?
-
1
These actions start by making sure your image is flattened (Layer>Flatten Image).
-
2
Next, they oversize your image by 1mm. So, for example, if you are running the A5 action, the new size will be 149mm x 211mm.
-
3
With the new slightly too large size, the action now increases the canvas size to allow for a 3mm bleed. The canvas size is now 154mm x 216mm.
-
4
Remember the extra 1mm from step 2? Half of this boarder is individually selected on all sides and stretched out to the cover the full extent of the canvas. This give us the 3mm bleed. Please note that these Photoshop Actions work particularly well for designs with flat colour background without elements that run over the edge. However, they will work for other designs. Just please be aware that the bleed section will look slightly odd. Keep in mind that printers are unlikely to under trim by much if at all so the vast majority of what you see will not be printed.
-
6
Finally, the action converts your design to CMYK and sets resolution to 300dpi giving you a full preview of how your design will look when printed, but before trimming.
All you have to do now is save the design and, if you're happy with it, send it over to your printers…hopefully StuPrint.com.
Here are the Photoshop Actions…
They are sorted by page size and orientation (landscape or portrait). Simply click the one you want to download. Follow the instructions below on how to install and run your Photoshop Action.
How to install and run these artwork actions:
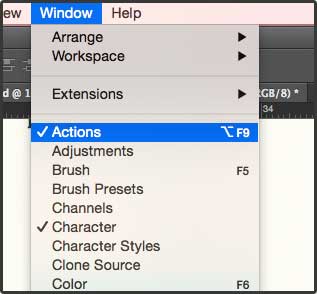
This will make the following mini-window appear in you workstation. Once it has appeared, select the tiny dropdown in the top right hand side.
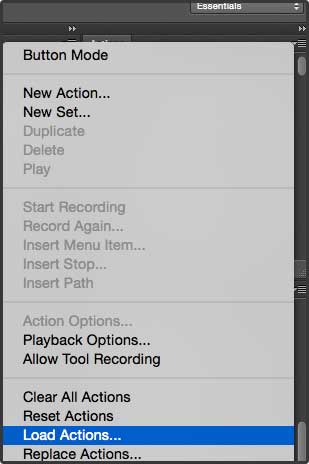
From that dropdown, click on "Load Actions…".
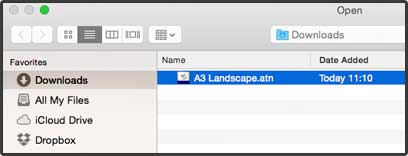
You will be prompted to select the action file. This will be a ".atn" file. Simply select and open this.
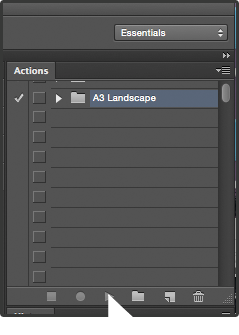
All that's left to do now is to run the action. To do this, simply select the action in the window and click the triangular play button at the bottom. The action will now begin getting your artwork print ready. Please note that this will only work on the artwork window that is open.
One its finished, have a good look over. If you're happy with the final product then save it to your hard drive and send it off to your printer.
Some health warnings:
We strongly recommend that you keep your original artwork somewhere safe and do not overwrite it. Don't forget that these automations flatten all the layers in your design so you will not be able to edit them after.
We unfortunately cannot accept any liability for damage to designs or issues with final print runs.


