A Bleed is another one of those printing terms that you, unfortunately, have to be aware of. What is a bleed? How do you put a bleed on your artwork? Why are bleeds important? What happens to the bleed during the print process? It really is very simple so read on to find out…
If you’re going to be doing a lot of printing, you really should get to grips with the term ‘bleed’. By adding a bleed, or getting your designer to add a bleed to your artwork for you can speed up the hold printing process and help you get your print when you need it.
Quite simply, a bleed is an extension of your design beyond the actual boarder of the paper. The vast majority of it is clipped off during the printing process. The obvious question you should be asking is “why is a bleed necessary at all?” Well you would be quite right to ask that because it does seem counterintuitive to add a bleed onto your artwork only to then cut it off during the printing process. The fact that needs to be understood is that batches of, say, A5 flyers are not actually printed on pre-cut A5 pieces of paper. In fact, in order to keep cost down, printers run large rolls of wide paper into their presses and pool jobs together in order to be more efficient. This means that on a meter-wide ream of paper, your flyers might only occupy a certain area. Obviously your design needs to be cut out of this mêlée. It is this cutting aspect that makes the bleed necessary.
The cutting process is not exact. There is in fact a 1-2mm tolerance. The idea of the bleed is that it accounts for this margin of error. This can be seen here:

In the above example, we can see that a flyer has gone to print without a bleed. The clipping process has gone a bit wrong (but within its tolerance) and the finished product is left with a nasty white line down the side. In the other image, we can see what happens when over-clipping occurs. The design went to print with no bleed and with text running all the way up to the side. Here, the clipping process actually clipped too far and into the actual design. Both scenarios are far from ideal. The solution is to add a bleed to your design. This gives a margin of error when clipping. The industry standard bleed size is 3mm, no matter the size of paper being printed. This is how it should look:

This piece of artwork has a 3mm boarder running around the outside of the main design (denoted by the white line). Importantly, nothing integral to the actual design (text, photos, patterns) falls within this section- just the background of the artwork.
We have actually heard that some printers will go to print without alerting the customer that there is no bleed. This can lead to a completely wasted print budget and a very unhappy customer. StuPrint.com is not one of these printers. We will always alert you if there is no bleed on your artwork. If at all possible, we will actually apply the bleed ourselves by resizing your design and adding on the appropriate color.
How do I add a bleed to my artwork?
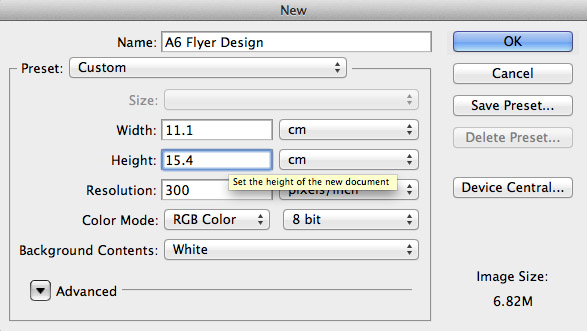
Well it really couldn’t be simpler. If you’re using a graphic designer then simply tell him that you need a bleed. He or she will know exactly what you are talking about. A lot of StuPrint.com’s customers do a lot of the design work themselves. With the programs out there, this really couldn’t be easier. InDesign, Publisher and Photoshop all allow you to adjust the ‘canvas size’ of your image. So when you start designing, make sure your canvas size incorporates a bleed:

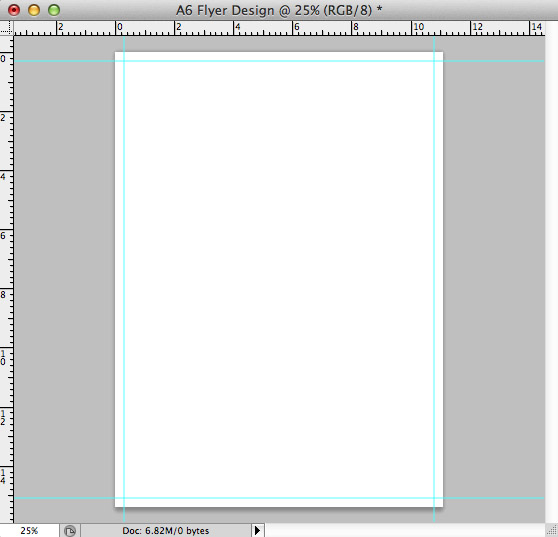
Here we are using Photoshop. We are about to start designing an A6 flyer, the dimensions of which are 10.5cm x 14.8cm. However, I’d like to add on the 3mm boarder. That means I am actually adding on 6mm to the height and 6mm to the width (to account for the 3mm on both sides). Once the canvas is set up, I am able to drop down smart guides to show me exactly where my bleed finishes. I can then work safe and sound within this boundary.


Smart guides are available in all major design programs so have a Google if you need to know how.
So don’t forget, although bleeds are excruciatingly boring, they can stop your design from being ruined and can speed up the time period it takes for everything to arrive. Make sure you get exactly what you want by including bleeds on your designs.
StuPrint.com is here to help at every step of the way. Why not give us a call if you’re in the process of knocking up a design and we will give you all the information you need. As well, it is worth noting that StuPrint.com is the only printer we know of that will actually add on a bleed if you don’t know how to, have forgotten to, or are in a rush. We really are very flexible with this sort of thing.
Why not have a look at our handy design templates? Here you will find downloadable PDFs that are specifically scaled for each paper size we offer. They have a handy dotted line showing the ‘safe zone’ where there is no chance of your content getting clipped off and the point to which your bleed needs to stretch. Follow this and you wont go far wrong.
The finish, we thought we’d stick down a handy bleed table. Here it is:
|
Paper Size |
Finished Paper Size (cm) |
Paper Size with Bleed (cm) |
|
Business Cards (standard) |
8.5 x 5.5 |
9.1x6.1 |
|
A7 |
10.5 x 7.4 |
11.1 x 8 |
|
A6 |
14.8 x 10.5 |
15.4 x 11.1 |
|
A5 |
21 x 14.8 |
21.6 x 15.4 |
|
A4 |
29.7 x 21 |
30.3 x 21.6 |
|
A3 |
42 x 29.7 |
42.7 x 30.3 |
|
A2 |
59.4 x 42 |
60 x 42.6 |
|
A1 |
84 x 59.4 |
84.6 x 60 |
|
A0 |
118.8 x 84 |
119.4 x 84.6 |
|
DL |
21 x 9.8 |
21.6 x 10.4 |
These measurements hold true for all printed products offered by StuPrint.com, including individual pages of booklets, magazines and brochures.
MORE ARTICLES!
How do you design a great printed poster? Have a quick read of this to get you designing with confidence
Taking on a designer to put together your flyer artwork? Learn how to write a great flyer brief by clicking here
Have a read about how a well-delivered booklet or brochure could really help with your business’s sales figures
Have a look over StuPrint.com’s checklist for flyer designers. You wont be sorry
Printing flyers? This great little article has some top tips from one of our more experienced (elderly) print gurus
Resolution and understanding DPI is really important to get your artwork as crisp as can be. Have a read through this for an explanation
So you’re looking at leaflets? Check out this page for tips on getting your deign looking great
Still working on your design? This blog post has a list of sites that are offering great stock photos for FREE
Confused by the print industry? You’re not alone. We put together a glossary of terms to help you break down the print jargon
If you’re looking at printing booklets then a great option can be self-covers. This news post explains what that means
If you want to make sure your design comes out looking great then its important to get to grips with RGB and CMYK colour modes. This article lends a helping hand
